
Remediation is a more involved and costly service than simple repairs, so it’s understandable that homeowners may want to avoid it if possible. However, delaying remediation can lead to even more expensive repairs down the road.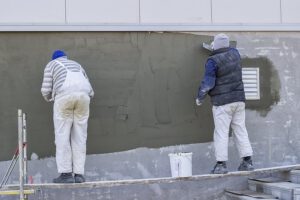
Stucco Repair Philadelphia addresses surface-level damage such as cracks, mold, and moisture intrusion. A stucco pro will check the wall for underlying issues and install a new vapor barrier and metal lath.
Remediation is a different type of stucco repair that addresses the underlying issues that cause stucco to deteriorate. This typically involves tearing down the damaged stucco and installing new materials, such as a new vapor barrier, metal lath, or wood lath, if necessary. It also usually involves installing a layer of waterproofing to protect the substrate and walls from moisture infiltration. Remediation is more expensive than simple repairs, so it’s understandable that many people will avoid it if it’s not absolutely necessary. However, continuing to postpone remediation will only result in further damage and higher repair costs down the road.
One of the most common causes of stucco failure is water intrusion from groundwater or drainage problems. Moisture infiltration can wreak havoc on a stucco finish as well as the building frame and wall cavities. This is why it’s important to always investigate moisture intrusion problems and find the source of the problem.
Other common reasons for stucco repair include mildew, fungus, and mold growth; discoloration; fading due to UV rays; and the presence of animals on the home’s exterior. If any of these signs are present, it’s essential to contact a professional right away. A professional will inspect the damage and determine if it’s caused by an underlying issue such as foundation problems, incorrect installation, or leaking pipes.
Before starting to patch the stucco, a professional will remove any loose sections of the material. Loose stucco often bulges and feels spongey to the touch. Tap gently with a hammer to test for sound. Weak sections will make a hollow sound, while intact sections will send back a solid response. To avoid damaging the underlying structure, a chisel or hand-held scraper can be used to separate the loose material from the drywall underneath.
After repairing the underlying issues, a professional will install a new vapor barrier and metal or wood lath, if necessary. They will then apply a base coat and let it dry before applying the finishing coats. If desired, the professional will paint the finished product to match the original color of the stucco.
Repair
Stucco repair is a surface-level fix for stucco problems such as cracks or flakes. The goal is to get rid of these issues before they spread, but a good stucco pro can also make sure there aren’t any underlying causes for the damage.
This can involve a thorough inspection of the wall system, especially around windows and other fixtures, to look for moisture intrusion. Leaking can cause structural damage and other problems, so the first step is to find out if this is the case.
There are a few warning signs that you should watch for that indicate you may need to call in a stucco professional. These include a dark stain under or around windows, cracks in the stucco that extend past window sills, and a damp, musty smell near the walls.
Some types of stucco damage are unavoidable, such as severe weather conditions or excessive moisture exposure. Other damage results from rushed jobs, such as failing to wait for the base coat to cure or a poorly mixed recipe that won’t set properly. Still other damage is the result of the natural settling of a house or the movement of a foundation.
Often, the best way to determine the extent of a damaged stucco area is to break off some of the old plaster to reveal the lath underneath. Check this layer for any rust or other damage, and cut away any damaged areas of the lath with a pair of metal snips. Once the damaged stucco is removed, you can apply a fresh coat of plaster and paint it, if desired.
When repairing cracks, it’s important to choose a plaster that matches the color of your existing stucco. You can buy coloring pigment and mix small batches to match the color of your stucco, or you can add a small amount of the dye to your new plaster before it’s applied. After letting the patch dry according to the manufacturer’s instructions, you can paint over it. This can help conceal any patches and keep the new plaster from peeling. It’s a good idea to repaint the entire wall system when you’re finished, too.
Patching
Stucco, a lime-or-cement-based plaster that’s applied to exterior wall finishes in a three-coat system to ensure proper setting, sealing, and insulation, is often considered a laborious and difficult home repair project. However, the right preparation work can make stucco patching far more manageable than many homeowners realize.
The first step in repairing stucco is a thorough inspection to identify the problem areas. Inspectors use a moisture meter to insert small probes in suspicious wall areas to determine the extent of water intrusion and damage. A full inspection includes a look at plumbing, windows, and other components that can affect the overall integrity of your home’s walls.
Once the inspection is complete, your contractor will begin repairs and remediation. Remediation is a more involved process than simple repairs and will include removing the damaged sections of your stucco, addressing underlying problems, and applying a new finish. Remediation can cost a significant amount of money, but it’s a far better alternative to the ongoing costs that come with water intrusion and mold damage in your home.
In order to prepare the area for patching, it’s important to clean away any debris in the crack or hole. It’s also important to wet the surface to help the new stucco adhere to the existing material.
After the area has been cleaned, you’ll need to mix a batch of stucco patching mixture. You can find pre-mixed stucco at most hardware and home improvement stores or make your own using a traditional cement and sand mixture, such as DAP Rapid Set. Either way, you’ll need to follow the manufacturer’s instructions for mixing and application.
The first coat of your patch will be the scratch coat. After applying a thin layer, allow the patch to dry for seven days. After the scratch coat has dried, mist it with water and score its surface to improve its bond to the brown coat. Then trowel on a second coat that’s just below the level of the existing stucco. Allow the brown coat to dry for seven days, and then trowel on a final coat that matches the texture of your existing stucco.
Painting
Stucco is an extremely versatile material, and it can be used to create a variety of textures and looks. However, like most things, it can suffer damage over time. The damage is most often the result of some kind of external force that impacts and breaks it, but it can also be caused by deterioration over time due to water or sun exposure. Stucco repairs are surface-level fixes that don’t require the extensive work of remediation and will generally be much cheaper.
Before painting, a good inspection of the stucco is necessary to see what needs repair. Check for signs of moisture by inserting a moisture meter into suspected areas. If you find evidence of moisture, the first step is to address the problem by caulking and resealing.
Once the moisture is taken care of, it’s time to prepare for painting. A thorough power wash is recommended to clean the wall and remove any chipped or peeling paint. Make sure that the entire wall is cleaned, including the low sections near the ground. If you have any signs of mold or mildew, these will need to be addressed before paint can be applied.
Small cracks and holes should be filled with high-quality masonry caulk. There are several different types of caulk available, depending on the type of damage, but exterior acrylic caulk is typically the best option for hairline cracks and holes. Polyurethane caulking is better for larger cracks, as it provides more of a seal.
Larger cracks and blemishes should be patched with a stucco mix that is close to the color of the surrounding, undamaged area. Apply the patching compound in a thin layer, using a float or wire brush to ensure a uniform look. Let the patching dry completely before applying a finish coat.
Painting over cracked stucco can be a laborious task, but with the right preparation and tools, it’s more manageable than some may think. It’s also important to understand the causes of the damage so that steps can be taken towards prevention rather than simply covering up problems when they arise.